Friday, May 18, 2012

How to Change the Chart Column Width in Excel

The default column width in Excel is pretty narrow, and the location to change it is not very straightforward. It took me a long time to find so I thought I would throw a quick step by step on here with pictures.

Here is the bar chart with the narrow widths that I want to make larger:

 Right click on any of the bars and go to Format Data Point.

Under Series Options there are settings called Series Overlap and Gap Width, these are the settings you can tweak to get your desired bar graph size and thickness.

 Here I have adjusted the Gap Size to be 15%, down from 150%. This makes the bars take up more of the space of the "row" that they are in.

Making the bars fatter is what I wanted to accomplish so that they stand out more so I will stop here but fiddle around with the options in format to get your desired bar settings.

Tuesday, April 24, 2012

How to Become a Professional Civil Engineer

One of my largest life goals of the past seven yeas or so has been to become a licensed professional Civil Engineer (PE). The PE license allows an engineer to legally make structural and infrastructural decisions, and to be PAID for it! I really want to use my PE license to design homes, commercial buildings, roads, streets, grading plans, water systems, make soil recommendations and all sorts of other things.

Another perk of the PE license is that it allows you to legally become a Principle of a firm (at least in California, it is possible you can become a principle without a license elsewhere). This is another life goal that I have, I want underlings! I want to interface with potential clients that will produce work for me and not for my "boss". I want the risk of potentially not having enough clients or work, and also the inherent rewards of doing it all right. If doing this were unavailable to me, the Civil Engineering profession would not entice me.

So how do you get the PE license?


  1. Desire. It is a 7-9 year process MINIMUM. You will probably give up if you do not have a strong desire.
  2. Get a Bachelors degree in Civil Engineering from an ABET accredited university. Most state and private universities that offer engineering degrees are ABET accredited because it is a huge deal and they probably would not attract many students without it. I received my degree from Cal-Poly Pomona, a California State school. (4-5 years typically)
  3. Prior to graduation (best) or following graduation (ok) take part in, and pass, the Fundamentals of Engineering examination. After doing this you can place Engineer in Training (EIT) after you signature, signifying your high-and-mighty training position.
  4. Obtain a job working under a principle engineer, doing actual Engineering work alongside registered professional engineers. Most states require two (CA), or four (everywhere else?) years of engineering experience where you are directly involved in calculations and making engineering decisions. You need to work with registered professionals because you will be required to obtain recommendations from several of them to qualify to take the Professional Engineering Examination (PE Exam).
  5. After meeting the requirements (BS EIT + 2 years experience, or a buttload of experience) get your recommendation letters together and apply for the PE Exam! You are required to choose you depth option when registering, so do that now as well. Choose a depth that is tied to your skills or something that you are genuinely interested in. Try to choose a date at least 6 months out, preferably more, so that you have ample time to study.
  6. STUDY. Study a lot. Many people have cited a magical 300 hours of study as being appropriate to go into the test confidently. Print out the exam specifications from the PE exam page at NCEES for your depth option and make sure you understand every topic outlined on it. Purchase exam material including (certainly not limited to) a review manual, sample problems to solve, and possibly even a review class.
  7. Celebrate
I am currently at nearing number 5 in this process and have begun my studying and preparing for the test. I have decided that a great way to study is to compile all of my study material online so that I can access it from anywhere and hopefully get comments and interaction from other people who are also studying. I started www.reviewcivilpe.com in February 2012. 

Review Civil PE already contains articles and notes on a large number of PE Exam topics including structural, geotechnical, construction, water and environmental, and transportation and it is constantly expanding. 

It is a great way to study passively while at work or on the go so you don't have to lug around your 1000 page reference manuals everywhere. Check it out and let me know what you think through the contact page if you have any thoughts or suggestions.


Sunday, April 15, 2012

Using Dreamhost to Store Personal Files


Dreamhost offers free personal storage with every webhosting account! My wife and I have decided to use this instead of options like Carbonite or Dropbox, due to it being free with every Dreamhost account. It didn't use to be this way..

Turns out that back around 2008 Dreamhost had a huge issue with people using their standard webhosting user accounts to store personal files (music and other media etc) and made it against their Terms of Service which states that "It is against DreamHost policy for you to use your DreamHost file storage space on a web server for personal file storage that is not related to one of your websites."

This limitation is still in effect, however, Dreamhost has graciously given every hosting account a free Backup Account which can be used for storage of personal files. The backup account comes with 50 GB for FREE and any extra space can be purchased at $0.10 / GB (inexpensive!). I am thrilled to have found this and have already started a ~6 GB ftp upload from my wife's computer.

All you have to do is activate your backups user from your Dreamhost panel here:


After that you are given a new ftp server, user login, and password. The process will be familiar to anyone that has connected to an ftp server before (and most of you with a Dreamhost account have).  I like to use FileZilla:


Get a Dreamhost Account

Use the promo code DEVLABTECH when signing up for a  FREE domain registration!


Monday, January 30, 2012

How to Make Javascript and Jquery Selectors function after Content is Refreshed with AJAX

So today I had another really specific problem while working on followtheproject.com. For my setup I have a group of <a> elements that are targeted by a jQuery selector, like $("a#id"), that was capturing their click() events and performing some ajax requests instead of going to a link. The return data for the ajax request reloads all of the <a> elements. The problem is that these newly loaded <a> elements are no longer targeted by the Jquery selector!

After some searching I found an extremely easy answer to solve this. The secret lies in jQuery's .live() function: http://api.jquery.com/live/

syntax:
selector.live( event, handler(eventObject) )

By wrapping event calls in the .live() function you are ensuring that all elements that match the selector, both now and in the future, will be targeted. This is different from regular selector and event functions because those are only applied to current elements that match the selector.

Old code 
$("a#id").click( function(e){ STUFF } );

New code
$("a#id").live('click', function(e){ STUFF });

For the lazy, here is the link to all of Jquery's event handlers: http://api.jquery.com/category/events/

Easy Peasy. The link will not always be redirected to the jQuery click event through the live() function, even after AJAX reloads the <a> elements! I wonder why the developer's of Jquery don't just build this into the normal click() and other event functions. Any performance hits would likely be worth the extra functionality.

Monday, January 23, 2012

Simple Site Search across Multiple Google App Engine Models

Search is a pretty important thing to have on a website. It is expected on every website and has become so prominent that it is many users main method of navigation on a site.
 

I have been working on a project management-esque application on Google App Engine, www.followtheproject.com , and have continually been putting off providing search functionality. I knew it was necessary from the beginning of development and have had a placeholder search input in the title bar and a search page for results, but no functionality at all, and very little guidance or ideas on how to provide that functionality across my application of many models such as Project, Account, Activity, File, Discussion, Comment etc.

This weekend I finally stumbled on a basic method to provide that functionality quickly and fairly easily. This method basically just “Gets it to work”, it is barebones with nothing fancy like auto completion or sorting. It is a good starting ground.


The starting point I used is found at http://www.billkatz.com/2008/8/A-SearchableModel-for-App-Engine on a blog post titled “A SearchableModel for App Engine” from 2008. I have no idea why it took me so long to find as I was searching for termes like “site search appengine” and “model search appengine” and it took a while to find a proper easy solution that is free.


Searching a Model, Easy


App Engine comes with a search module at google.appengine.ext.search. In the .py file that contains your models include this import:


 from google.appengine.ext import search 


The search module includes a class called search.SearchableModel which is a subclass of db.Model. Change desired searchable models to search.SearchableModel. 

class Activity(search.searchableModel):


This class provides functions that index an instance of the model whenever it is saved (with .put() or .save() ). Instances that are indexed can be searched using simple query syntax.


query = Activity.all().filter(“project =”, project).search(“some query string”)


I filter by project first because all of my searches will be project specific to whichever project is currently active. Optionally these results can be sorted by anything you would like using a .sort() call at the end of the query.


So how to search across multiple models?


Queries (as far as I know) can only be applied to one model at a time. To accomplish site-search over multiple models I simply did a separate a query for each model type I wanted and placed all the results in my values list to be sent to the template. In the template I list on results by model type, for my project management application this works nicely and the results can be somewhat sorted by category this way. I went with an order of importance based on my own judgment, which may change later. The order I used is Activities, Files, Discussions, People, Comments.
 

Next Steps

There is a lot to be desired with the built-in module. No autocomplete, no sorting by importance, and Bill Katz outlines a few more:

  • If you try to index too much text, you might run into CPU quota issues on put() as it builds the index.  Background processing, if it gets offered in the future, would address this issue.
  • There is a cap of 5000 indexed property values a single entity (one model instance) may have.  This could severely limit your keywords if you have a large number of indexed properties.  ListProperties take a toll.  Text and Blob properties aren't indexed, but your text property will generate keywords in SearchableModel.
  • SearchableModel entities currently don't display well in the App Engine data viewers because of the size of __searchable_text_index.
  • Multi-word searches seem broken for now because indexing the same property multiple times is not available until the next SDK release.
I believe that last one has been resolved now as the original post is from 2008 and I seem to be able to search multiple words. Try and design your app to sidestep these issues for now, and plan solutions for the future. I am doing that on mine.

Thanks and I hope this is useful to someone. It sure was to me this weekend!
Please let me know if you stumble on this and have any input as I will take it into consideration.

Friday, January 20, 2012

Detect where the scroll bar is with JQuery and provide visual cue to the user

I have a web page with a "display: fixed; z-index: 1; background: white" header at the top of the page. When I scroll down the body of my page slides behind the header. It works well but there is a problem:

  • There is no indicator aside from the scroll bar that the page is not at the TOP and it is deceiving.
To fix this I decided to use some simple JQuery watch for when the page is not scrolled at the top and to shade the background of the header slightly.


$(document).ready( function(){
  $(documnet).scroll( function(){
    var scrollPosition = $(document).scrollTop();
    if (scrollPosition == "0"){
      //The page is scrolled to the top
      $('#header').css('background', 'white');
    }
    else {
      //The page is not at the top
      $('#header').css('background', 'gray');
    }
  });
});


The code fires whenever the page is scrolled and checks if it is at the top. If it is at the top, it sets the header background to white. If it isn't at the top it sets it to gray and is a good visual cue to visitors that they are not at the top of the page.

A popular on is to display a hidden div in a fixed position near the edge of the screen with the text "Scroll back to top". When that div is visible the page is obviously not at the top, and when it is clicked, it is expected to take you back up to the top.

Here is some sample code for the click event to that takes the screen back to the top:

$(document).ready( function(){
  $("#scrollmessagediv").click( function(){
    //scroll to the top of the page
    $(document).scrollTop(0);
    //hide the element since we are at the top now
    $(this).hide();
  });
});


There are lot of ways to get creative with scrolling and JQuery, hopefully this got you started!

Thursday, January 12, 2012

How to Attach a Vertical Line to a Milestone in Microsoft Project 2010

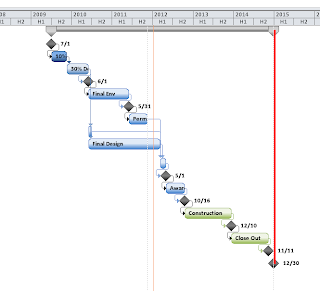
Looks like we the deadline is met!

A big bold vertical line is a great indicator for a deadline/do-not-pass-or-else date in a schedule. The problem with drawing them in is that they second the timescale is changed or the project is zoomed the line is far off of where it needs to be. With the method below a line can be attached to a milestone and will move and scale with that milestone no matter the scale or zoom level.

Start a new line object by going to the Format section on the Ribbon and selecting line from the Drawing dropdown.

Left click and drag in the general area that you want your final line to be in, exactness is not key here only general limits.

  • Double Left Click the line to bring up the Format Drawing box and Left Click the Size & Position tab. 
  • Left click the Attach to task radio and enter the task ID into the box. The Task ID is the number to the far left of the desired task. In this example mine is 18. 
  • Click Ok.
Your line suddenly jumps, stay calm.

Straighten things up. 
  • Drag the line back to the general area you desire, it will stay from now on now that it is attached to a task. 
  • Double left click the line again and enter -0.10 in the Horizontal box. This will center the line on the milestone. 
  • Enter 0.00 in the Width box. This will ensure the line is straight. 
  • Click Ok.

The line should snap into the correct place. The height of the line was more or less defined when you originally drew it loosely. Feel free to adjust, and if you make the line crooked simply double left click the line and re-enter 0 in the Width box.

Make the line big, bold, and red (or whatever you choose it to be) by clicking the Line & Fill section of the Format Drawing box. Select your desired color and Line thickness. Click Ok.

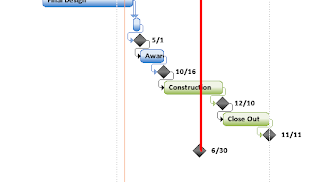
That’s it! It is graphically pleasing and easy to understand for those VPs or clients that may not understand the importance of an upcoming deadline. Persuade them even more by adding a secondary scenario where if a desired action is not taken place it pushes the project past that imposing bold red line. Go get em.
UH OH we have crossed the RED LINE